Book Online

Essential guide to capture comet C/2020 F3
Seeing a comet with your naked eyes is nearly one in a lifetime opportunity. It is only visible as a dim beam of light, but it’s the realisation that this light streak is actually a comet that is some 103 million kilometres aways is what was giving me a full spectrum of emotions. It is pretty unbelievable it is just a bunch of rock and ice, and a touch of mystical feelings comes into the mix of feelings. I highly recommend taking some effect to try to see or capture it before it disappears (and another comet shows up). Here, I composed a brief and quick essential guide of how to photograph it. All that’s written here is purely my (sometimes biased) opinion based on 2 sleepless nights chasing it. I am pretty sleepy as I write, so I hope you will forgive me for any typos, mistakes, or incorrect data and assumptions. Nevertheless, I hope you will find this guide helpful, and I would be happy to hear any feedback about this guide, or your experience with the comet.
FOCAL LENGTH
The biggest question I had before going to shoot the comet is which focal length would I need. Many photographers I know would just take every lens they have. It might be the appropriate solution if you’re not carrying your gear too much up (or if you are very strong and want to make up for your missed weight-lifting gym session). However, it is not very smart otherwise (especially for small females like me, who also sat most of the corona times at home). Here’s the illustration to help you decide which focal length would be the most suitable for you.

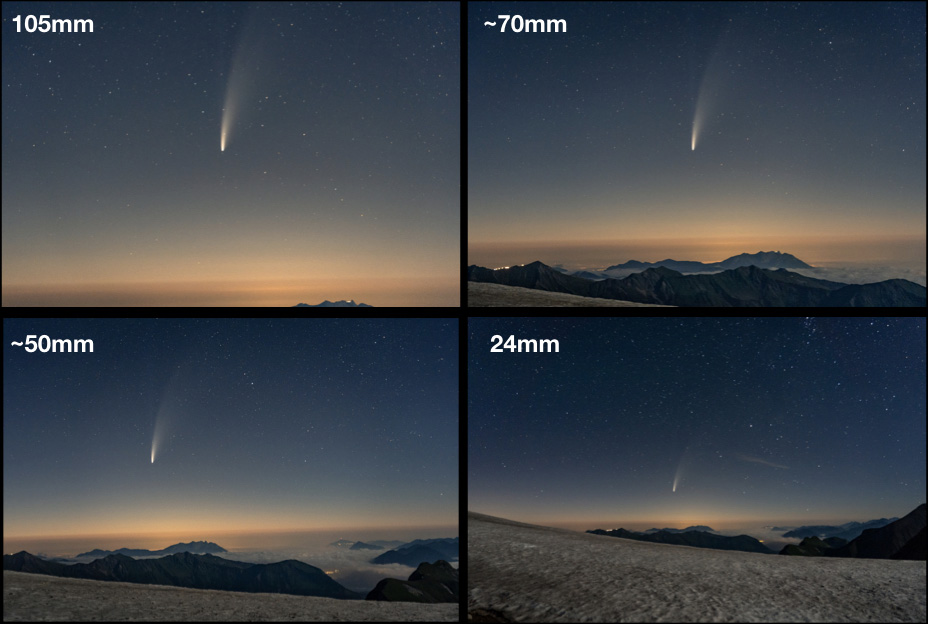
As for my experience, after taking a few close-up shots with 200-300mm, I was shooting in the middle range of 50 – 100mm for the rest of the photos. A slide note: all focal length values are referenced in the full frame equivalence. If you have a cropped sensor format, please use your conversion factor to calculate the focal length in full frame equivalent. For example Nikon has a ~1.5 crop factor for their Dx cameras. That means 20mm in APS-C format is roughly 30mm in full frame equivalent. As you can see from the photos, the comet tail is currently quite long, and if you want to also include some foreground, I would go for middle range. Of course it is always good to have close-up photos, but if you plan to go several times, I would just take a zoom lens once, and then go much later with middle range.
EXPOSURE TIME
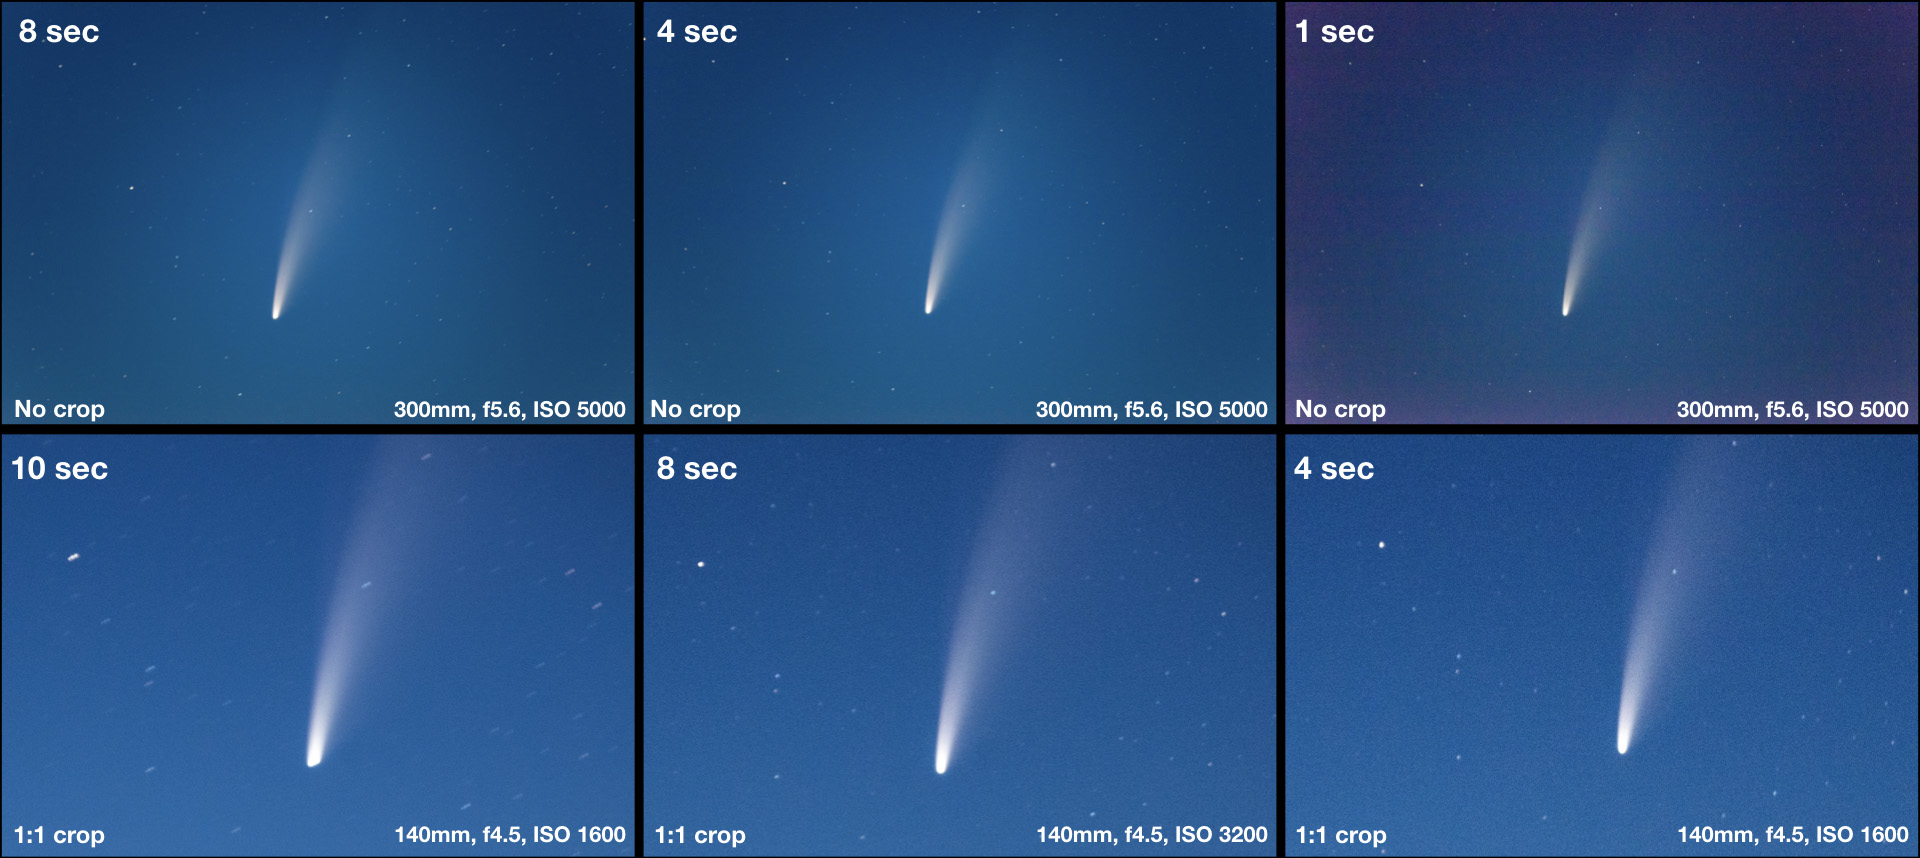
Personally I don’t mind some small star trails with the comet in the picture, as the stars are not the main subject of the photo, and they are actually not that bright anyway with the current phase of the moon and rising sun. From the other side, most people don’t have a fast zoom lens (less than f4), as it is very expensive, and also it weighs much more (the main reason for me not to have a fast zoom lens). Therefore, I preferred to increase the shutter speed a bit rather than boost ISO (purely my personal opinion). I was shooting mostly with 6-8 seconds exposure time. With these shutter speeds and mid focal length, the comet still looks round and the tail is well rendered. With 10 seconds and more, the comet is already noticeably blurred. If you don’t like blurred stars, or want your comet sharper, you should use the regular 500 (or your preferred number) rule for shooting the stars. Below is the comparison of shots with different exposure times for your reference.
SETTINGS OVERVIEW
Same as for milky-way/starry night photography, start by opening up your aperture to the max. Then choose the shutter speed so that the comet (or stars if you like) are not blurred, and then boost ISO so that your shot is well-exposed. Always use only histogram as a reference for the brightness, as your monitor on the camera might show you slightly brighter (or darker) photos. Don’t be afraid to boost ISO, you can deal with the noise later on (by taking a stack of photos, or using noise reduction software). Manual focus to infinity or close-up focus on the comet/moon/far away object. Use a steady tripod of course, which is especially relevant for big zoom lenses. Put 2 sec on the self-timer (or use remote control) to avoid camera shaking, and turn off all vibration stabilisation on your lens/camera. Also, I would recommend turning off all noise-reduction settings in your camera. Sky tracker is always a nice option if you have it (and managed to bring it to the shooting location) – it would allow to take longer exposure (with less ISO or higher aperture) photos without blurring the comet or stars (but with blurred ground instead). I have seen very amazing photos taken with the star tracker and around 1 minute exposure time – the trail is so much more beautiful. I will try to try it myself on the next clear sky window.
PLANNING
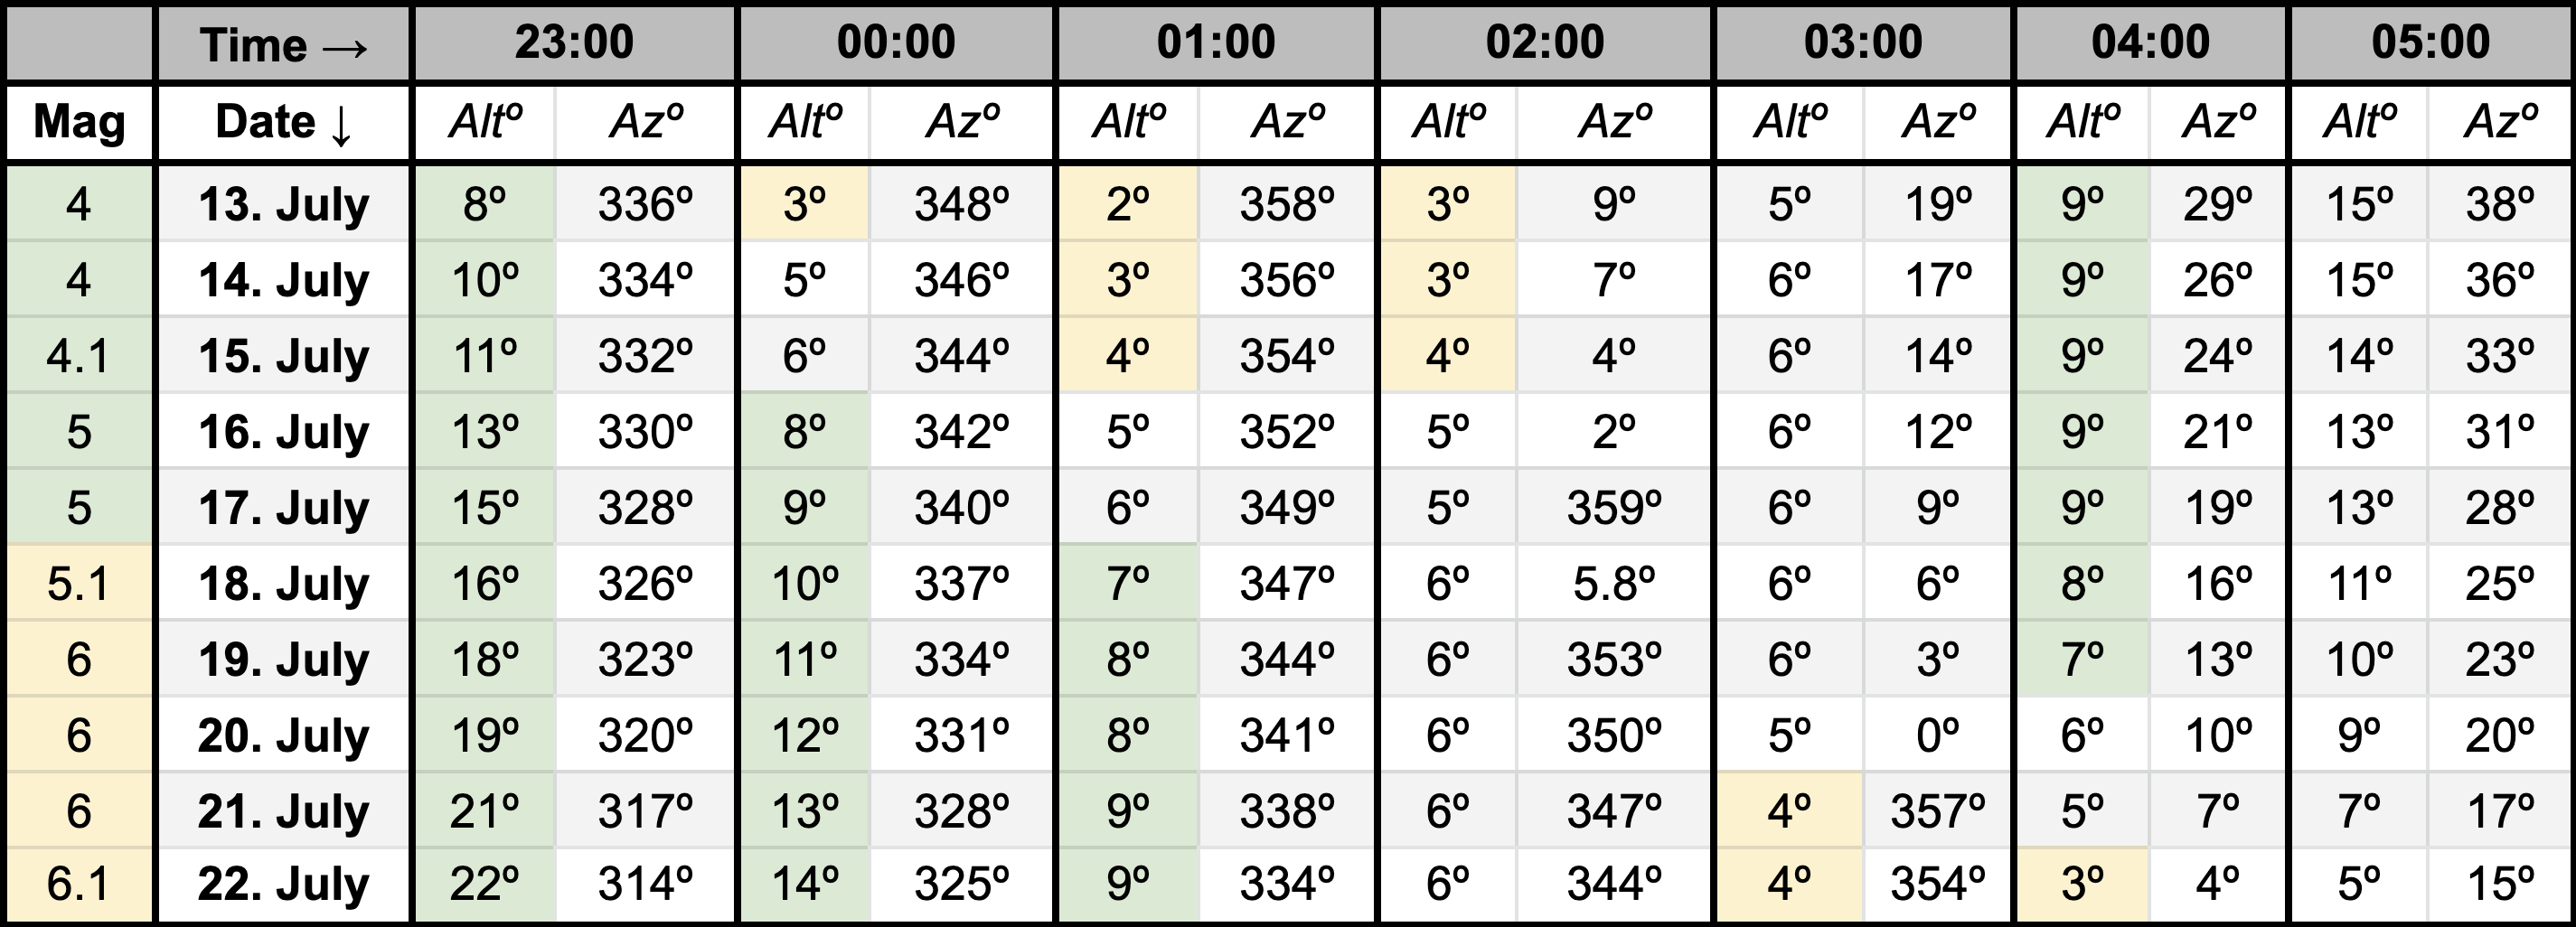
Although PhotoPills app does not have the comet in, it is quite easy to plan the comet shots with it. All you need to do is to get the azimuth and altitude values of the comet from some other source (for example from here). The table below shows altitude and azimuth values of the comet location depending on the date and time around Zurich, Switzerland (note the values are approximate and rounded). As the comet flies farther from the Earth, the brightness is decreasing, and the naked eye limit for stars is somewhere close to magnitude 5 (the larger the magnitude, the dimmer the object), so I have marked dates after July 17th with yellow (meaning more difficult to view). Likewise, altitude values lower than 5 degrees above horizon are marked with yellow, and altitude values higher or equal to 7 degrees are marked with green as it is easier to spot the comet on the uneven terrain when it is a bit higher up. At 5am it is already too bright in Zurich, but I still included the values for the reference (and interpolation).
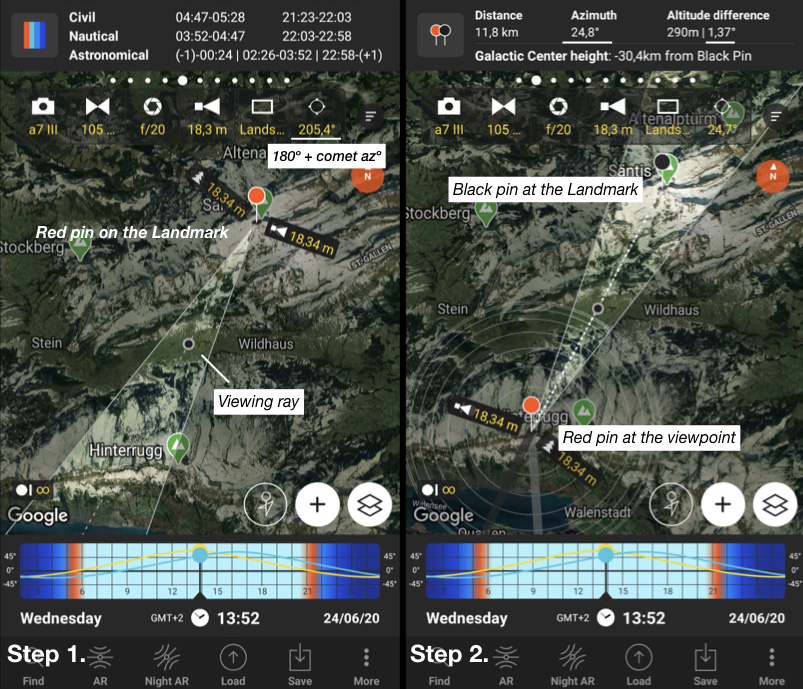
Usually I start my planning with the known Landmarks (I am not covering here how do you find not well known landmarks on the map). It helps a bit if you know which angle is the best viewing angle for the given landmark. For the comet, I selected landmarks that I knew might have some nice alignment when looking from the south of it (direction north from the viewing location), and filtered out most of my milky-way landmarks, as they are usually south-facing directions. Given the landmark, to find the best alignment with the comet, first in Step 1. place the red pin on the landmark, and use the viewing direction rotating handle to set it to the 180º + comet azimuth angle. When you found an approximate viewing location, the second step would be to try to spot a viewing location you might actually reach (mountain peak with accessible path or viewing platform) and move the red pin to that location, while placing the black pin on your landmark. Try a few different places nearby, moving the red pin to the right or left, to see how the alignment changes and to find the most optimal location. Of course the altitude should be taken into account. Your viewing location should be either higher than your landmark, or not lower (relative to the landmark) than comet altitude angle. If you placed the black pin on the landmark, and red pin to the shooting location, PhotoPills app will give you the angular difference between your viewing location and your target. With the azimuth/altitude table above, you can fine-tune your alignment and find the best date and time for your shot.
NOTES and TIPS
General rules and tips of star photography apply. Take enough food/water/warm clothes with you. Most probably you will be staying the whole night up, as the sunset is followed by late evening comet sighting attempts, then followed by milky-way (or moon session), back to comet chasing at 3am, and finally up to the sunrise at 5-6am. It is pretty busy, but very exciting times for photographers. Lens heater might help keep your lens without condensation if it is very cold and there is a mist. And extra batteries (or power banks) will help you run a bit longer. Be considered to others – don’t use your headlamp if there are other people around you, but watch where you go as you might stumble on something or fall even on the flat surface. And a final tip: Take a moment, and enjoy seeing the comet with your naked eyes, all gear aside. Hope you’ll have some clear skies. Have fun, and stay safe!
FOLLOW me for more
If you liked this article, follow me on Instagram or subscribe to my newsletter for more content like this (more useful guides and blogs coming).